I pulled the mast for some work that included replacing the main halyard sheaves, lubricating sheaves for the jib and spinnaker, replace the headstay, and some cosmetic painting. Below is where the sheave box is attached. This was removed, then the area cleaned up and sanded due to some oxidation. The area was primed with Zinc Chromate paint, then sprayed with Gloss White Krylon.
The sheave box is designed to maintain separation for up to 4 halyards.In the picture below, you can see how the sheaves are on a diagonal to maintain seperation where the halyards turn inside the mast. Note I have one regular halyard and two messenger halyards installed.
Similary, The external portion has 2 jib halyards below the headstay and, the potential for 2 spinnaker halyards above the headstay, although we just use 1 on Rhapsody.
Finally, someone took a picture of me trying to squeeze out of the bow compartment where I was reaching to turn bolts on the bow pulpit to rebed them.
Saturday, April 24, 2010
Wednesday, April 7, 2010
Misc Spring Projects
It's been a while since I posted work on the blog. Here are some of the ongoing projects this off-season. Thanks to Charlie Stoddard of Falcon, I now have a new set of hatch boards fabricated from Lexan and Teak. Charlie turned me on to a local plastic supply house and I was able to buy the Lexan for $60 out of their "seconds" bin. If I ordered it new, I would have paid over $150. The protective coating was left on to keep the surface free from getting marked up while the Teak was coated with Epifanes.
This is the reverse side, still with protective coating. There are a total of 6 coat of Epifanes "Wood Finish Gloss".
Once the boards were done, they were taken to the boat for fit. It required a rasp to shave the Lexan edges so the boards fit easily in the opening. I'm leaving the plastic coating on until the boat is ready to launch. I made Starboard winter hatch boards that I leave in place.
The next project is to clean up the boom. There are areas where the paint has bubbled and chipped off due to oxidation of the aluminum. I stripped all the hardware off, the sanded the boom with 150 grit paper. The boom was suspended in my garage so all surfaces could be easily accessed. Areas that were bubbled were sanded aggressively to bare metal. Once the boom was sanded, vacuumed and wiped down with alcohol, I spot primed all bare metal areas using the green looking zinc chromate etching primer.
After spot priming, I mixed a two part epoxy etching primer, thinned so I could spray using Preval disposable sprayers. This was allowed to cure for 24 hours, then I light sanded and applied 2 coats of gloss white Rustoleum appliance paint.
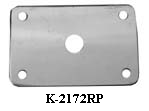
The end fittings were removed, cleaned and painted with black Rustoleum. I also ordered a set of boom bail bearing plates from Rig-Rite to strengthen the area where the through bolt attaches the main sheet bail. This is shown below. When this arrives, I'll attach it with 10-24 screws by drilling and tapping the holes in the boom.
I decided that I would try and remove moisture from the hidden bilge without cutting into the boat. A friend is in the ceramic heater business and let me borrow a propane powered one to heat the hull. The heater is shown below. This easily heats the boat surface to 150 degrees (hotter if you aren't careful).
I drilled a hole 1" behind the keel and attached a shop vac to draw any moisture and water vapor out that was generated by heating the core. There is also a tarp erected and held in place with duct tape to keep breezes off the heated area and allow the heat to be focused.
Here is a view of the "hidden bilge" area being heated. After about 6 hours, you could feel the teak cabin sole in the boat start to get warm, which means the hidden bilge was definitely getting heat to force out moisture. I let this rune for a total of about 20 hours.
More pictures to come with the other projects that are being worked.
This is the reverse side, still with protective coating. There are a total of 6 coat of Epifanes "Wood Finish Gloss".
Once the boards were done, they were taken to the boat for fit. It required a rasp to shave the Lexan edges so the boards fit easily in the opening. I'm leaving the plastic coating on until the boat is ready to launch. I made Starboard winter hatch boards that I leave in place.
The next project is to clean up the boom. There are areas where the paint has bubbled and chipped off due to oxidation of the aluminum. I stripped all the hardware off, the sanded the boom with 150 grit paper. The boom was suspended in my garage so all surfaces could be easily accessed. Areas that were bubbled were sanded aggressively to bare metal. Once the boom was sanded, vacuumed and wiped down with alcohol, I spot primed all bare metal areas using the green looking zinc chromate etching primer.
After spot priming, I mixed a two part epoxy etching primer, thinned so I could spray using Preval disposable sprayers. This was allowed to cure for 24 hours, then I light sanded and applied 2 coats of gloss white Rustoleum appliance paint.
The end fittings were removed, cleaned and painted with black Rustoleum. I also ordered a set of boom bail bearing plates from Rig-Rite to strengthen the area where the through bolt attaches the main sheet bail. This is shown below. When this arrives, I'll attach it with 10-24 screws by drilling and tapping the holes in the boom.
I decided that I would try and remove moisture from the hidden bilge without cutting into the boat. A friend is in the ceramic heater business and let me borrow a propane powered one to heat the hull. The heater is shown below. This easily heats the boat surface to 150 degrees (hotter if you aren't careful).
I drilled a hole 1" behind the keel and attached a shop vac to draw any moisture and water vapor out that was generated by heating the core. There is also a tarp erected and held in place with duct tape to keep breezes off the heated area and allow the heat to be focused.
Here is a view of the "hidden bilge" area being heated. After about 6 hours, you could feel the teak cabin sole in the boat start to get warm, which means the hidden bilge was definitely getting heat to force out moisture. I let this rune for a total of about 20 hours.
More pictures to come with the other projects that are being worked.
Subscribe to:
Posts (Atom)